Introduction #
The following document provides technical specifications and guidance to users of the UrgentChart EHR (electronic health record) product. The UrgentChart EHR is a web-based system that operates in a browser environment. This guide assumes that the user has general knowledge of navigating web-based windows and pages.
System Modules and Navigation #
Users may navigate through the system by using the Dashboard that appears after the initial login or the horizontal menu bar accessible on pages throughout the application.
The UrgentChart application provides the following modules:
- Patient Registration
- Order Entry/Composite Scheduling
- Electronic SOAP Report Signature
- Charting with VR, Macros, or free text.
- Patient Procedure History
- Immunizations Order and Management
- Injections Order and Management
- Clinical Summaries and CCDA’s.
- E-Prescribing
- Internal and External Lab Orders and Results
- Patient and Provider Educational Resources
- Clinical Decision Support Rules
- Staff Management
- Management Reporting
- Meaningful Use Automated Calculations
- Meaningful Use Reporting
- Complete Billing Functionality
- Billing Reporting
Application Security #
The UrgentChart application security is maintained by at a minimum five (5) user types: ADM, PHY, CLN, REG, and BILL. Descriptions and detailed privileges as follows:
| User Type | Description | Privileges |
|---|---|---|
| ADM | Super User/Administrator | Full access and privileges to all modules and all system tables |
| PHY | Physicians | Can view all screens except System Tables & Management Reports and Billing Can sign SOAP reports Can generate report results and modify reports in Charted status Can chart procedures using pre-defined templates Can sign charts |
| CLN | Clinicians | Can register patients and update registration records Can schedule and update procedures Can view all screens except System Tables & Management Reports, Sign SOAP Reports, Billing, and Physicians Worklist. |
| REG | Registrar/Scheduler | Can register patients and update registration records Can schedule and update procedures Can view all screens except System Tables & Management Reports, Sign SOAP Reports, Billing, and Physicians Worklist. |
| BILL | Billing Administrator | Can run Billing Cycle Report and Export or FTP Report Can modify order informationCan register patients and update registration records Can view Billing and Referrers tables Can run Staff Report, Data Access Report and Cancelled Procedures Report |
Security Audit Reporting #
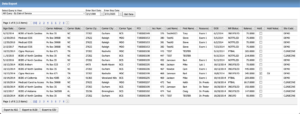
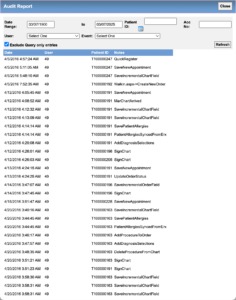
UrgentChart is equipped with a Patient Data Access log. This log may be initiated in the Admin section through Reports – Standard Management Reports – Security Audit Report V2. For any patient selected, the system will return a log that displays all the patient records that have been opened, what user opened them, as well as the date and time those records were accessed.
System Setup #
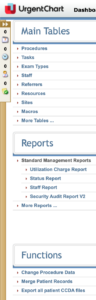
Users with ADM privileges may set up, modify, add, and de-activate data in the system tables. The system tables are accessed from https://<domain name>/admin/. System tables include: Procedures, Tasks, Staff, Referrers, Resources and Sites.
Note: To eliminate excessive data entry at set up, UrgentChart personnel can upload spreadsheets or text tile data for many of the tables.
Tables #
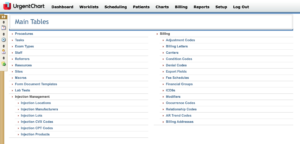
Carriers #
Insurance company data may be entered at Admin Section – Main Tables – Billing.
- An individual carrier may be accessed by performing a free text search in the carrier search window.
- Carrier names displayed in red are inactive and will not appear in the system searches.

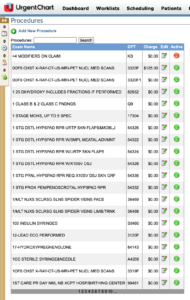
Procedures #
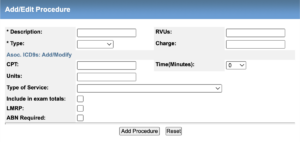
Procedure parameters are defined at Admin – Main Tables – Procedure.
- A new procedure may be added by selecting the Add New Procedure link.
- Procedures may be queried through the search procedures window by typing in free text.
- Procedures may be edited or made inactive by clicking on the Active (x) Icon to the right of the procedure listed.
- Procedures noted in red indicate inactive procedures. Inactive procedures do not appear on the scheduling screens.
The Procedures table contains the following parameters:
- Description
- RVUs Code
- Procedure Type
- Charge
- Assoc. ICD9’s
- CPT
- Time (Minutes)
- Chart
- Protocol
- Prep
Notes:
- Standard additional charges for procedures-these may be modified at the Complete Procedure Screen.
- Scheduling notes appear by a pop up window when the corresponding procedure has been selected.
- The procedure prep appears at the bottom of the Schedule Details screen when scheduling.
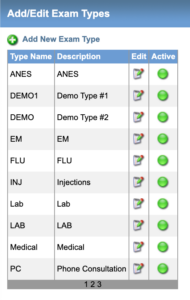
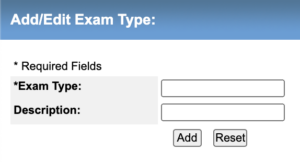
Exam Types #
Exam types are defined at Admin – Main Tables – Exam Types.
Exam types may be free text added from the Add Edit Exam Types on the Exam Type table.
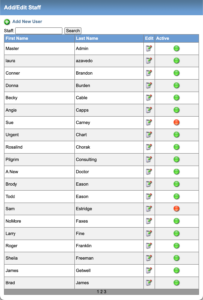
Staff #
Users are created and assigned privileges and sites at Admin – Main Tables – Staff.
- Physician users may scan signatures (in JPEG format) that appear on all signed charts.
- If assigned to a particular site, users will only see the Today’s Appointments & Schedule Grid for that site.
- If Site-Specific Data Only is selected, users will only be able to query patient data of patients registered initially at their assigned site.
- Passwords may also be set to expire on a per-user basis.
- Staff members may also have their worklists set up for a specific default type or resource. The “Use Secure IP” setting needs to be checked off for users accessing the EHR through a secure web site (i.e. https ://).
- When Change Patient ID is checked off for, that user has the ability to change patient ID’s on the registration page. Admin users have the ability to change patient ids automatically, so this option is checked off for users other than admin, who need the ability to change patient ids.
- Oversign Privileges allows a physician to sign off on a report that was not assigned to them. Users with “Overbook Privileges” can overbook exams on the schedule grid.
Managing Staff Tables
Staff may be edited or added from the main Staff Tables located in the Main Tables section of the Admin section. Staff may be deactivated b simply clicking on the X Icon next to the staff name. Staff in red have been deactivated.
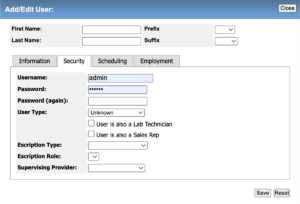
Add/Edit Staff
The Add Edit Staff control screen opens immediately after clicking on the Add/Edit Staff link on the Staff Tables. The main screen that opens first is where general staff demographic information is entered. Staff signatures may be uploaded from a JPEG image for digital signatures of documents from this screen.
- Staff Security
- The staff security fields must be completed to create user log in information. This is where the user type is created for accessing screens and functions relevant to their role as staff.
- User Type
- The allowable staff types are created in conjunction with the national standards required by Sure Scripts for E-Prescribing proper ordering of medications.
- Administrator, Physician, Clinician, Registration, Billing, Referrer, and Emergency Access.
- Staff signatures may be uploaded from a JPEG image for digital signatures of documents from this screen.
- The allowable staff types are created in conjunction with the national standards required by Sure Scripts for E-Prescribing proper ordering of medications.
- Staff Site
- From the staff scheduling tab staff location demographics are created. This is where staff will be allowed access at login. Physician and other staff signatures may be uploaded in JPEG form for digital signatures of documents.
- Staff Employment Information
- Important staff employment terms as well as state licensure and federal licensure information must be entered to guarantee proper information will be provided to carriers for billing. Other information will be used for staff management reporting.
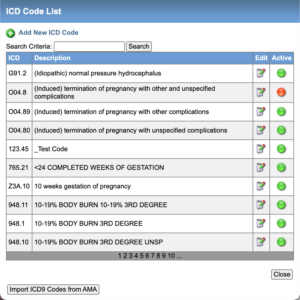
ICD9s #
ICD9 data may be entered into the ICD9 Table at Admin – Main Tables – More Tables – Billing – ICD9s.
A specific code may be found by performing a free text search either by code or description. The ICD9 table comes pre-loaded with all ICD9’s available through the AMA ICD9 code list.
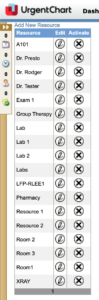
Resources #
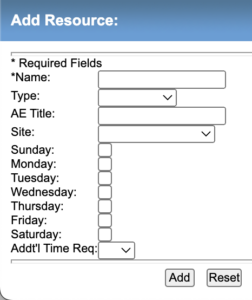
Resource information may be entered and edited in the Resource Table accessed at Admin – Main Tables – Resources. Each resource must be assigned a name, site, and type.
Add/Edit Resources
Important: Use of logical naming conventions are vital to the success of setting up the resources properly. Naming conventions impact how the resources appear on the schedule as well as display on financial billing data exports and standard managment and billing reports.
Note: Resources display in alphabetical order on schedules and reports.
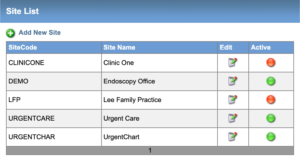
Sites #
The Sites Table stores information about each site within the enterprise. Data entered into the Sites Table, including each site’s individual JPEG logo (if uploaded), will appear on all faxed and printed reports. The directions to the facility, as well as a JPEG map image, will appear on the procedure confirmation form after a procedure is ordered through the Request Study screen. A second site description may be entered to allow users to distinguish between similarly named locations. Secondary site descriptions will not appear on printed reports.
Add/Edit Sites
The first tab is the General Information fields. Create a standard Site Code system that is logical and easy to remember. This will guarantee that the site codes index in the order that you want them to (ex: 001, 002).
Contact Details
All fields are required for proper set up with the exception of the Contact Name.
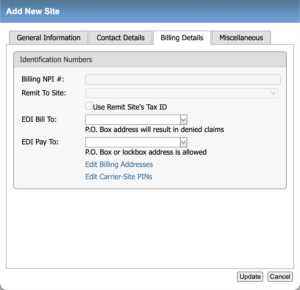
Billing Details
The NPI number should be unique to the site and the practice. Be sure to use the proper NPI and to input the numbers correctly.
Miscellaneous Add any miscellaneous information that may assist your staff or patients. This imformation will be available to print and give to the patients.
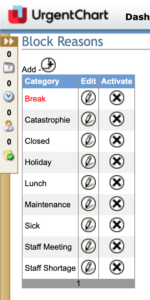
Block Reasons #
Admin users can add/edit/activate reasons in the Block Reasons table. To add a reason to the list simply click on the add button and fill in the reason in the free text box. By choosing one of these reasons from the quick schedule it will show the block reason and fill in the according time for the block in red.
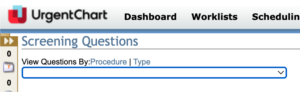
Screening Questions #
UrgentChart provides the ability to define custom screening and history questions. Questions may be attached to a particular procedure or type:
For each entry, a free text question, answer type (yes/no, free text), type -OR- procedure, a notation of whether an answer is requested, and an indication of which forms the question should appear, is stored. The user has the ability to select which pages throughout the system the question(s) will appear on in order as defined for each applicable type or procedure. Questions can be added to the History Sheet (H), Confirmation Form (C), Quick Schedule (Q) and the Print on Order (O). The user can also indicate whether these fields should be Required R) to answer in order to proceed to the next step.
In addition to the custom questions, images may be uploaded to appear on the history sheet. Typically, these images include, but are not limited to, anatomical diagrams or document image questionnaires.
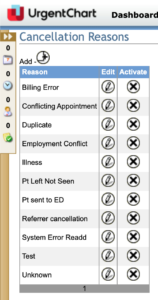
Cancellation Reasons #
Admin users may also add/edit/activate Cancellation Reasons from the Additional Tables selection in the Admin side. After these reasons have been added to the table they may be used when canceling an appointment. When an appointment has been cancelled the reason will be saved in the system. Later an admin user will be to view all cancelled reports and view the reasons by running a Cancellation Procedures Report from the Mgt Reports – Standard Mgt Reports.
Injection Management #
Injections Management provides a comprehensive tool for managing injection medications, lot numbers, and NDC numbers. The process begins in the administration of the injection products.
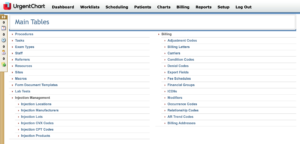
Accessing the Injections Management Screens: Go to Admin – Main Tables – More – Injection Management.
For future traceability of lots accurately it is vital the information be entered into each function exactly as it appears on the devices that the medications are ordered and delivered (boxes, labels, vials, etc.).
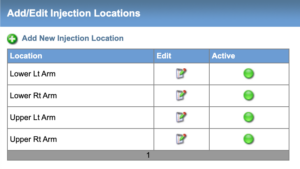
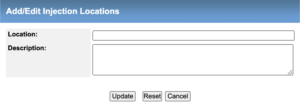
Injection Locations #
The user has the ability to set up all injections locations used by providers from the anatomy and to use their own naming conventions. Once an injection location is created it may be deactivated by clicking on the Active or Inactive button. Green is Active.
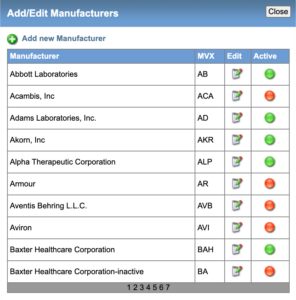
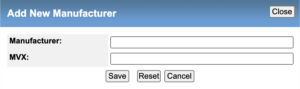
Injection Manufacturers #
The application comes preloaded with the annual list of injection manufacturers related to the immunization download provided by the CDC. To add addition injections it is important to include the manufacturer and to spell the name correctly and add the Manufacturers Code (MVX) exactly as provided by the manufacturer. It is important for traceability of lots to have all of the information accurate.
The Manufacturerers may be activated, deactivated, and edited from this screen.
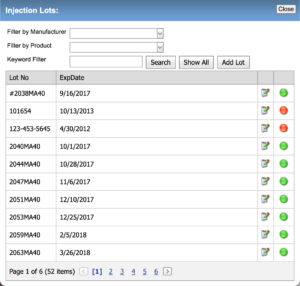
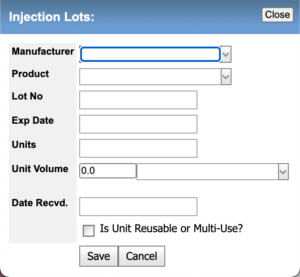
Injection Lots #
Lot numbers are related to the specific build of a medication by date, manufacturer and location. It is important that the lot number be entered in exactly as provided by the manufacturer on the labe, box, or device.
From the Add Edit Injection Lots screen pick a manufacturer from the drop down menu. If the manufacturer desired is not listed begin the process by adding the Manufacturer. All medications that have been entered for that manufacturer will be available from the Injectable drop down list. Once medication lots have been added they may be activated, deactivated or edited.
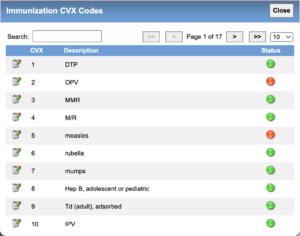
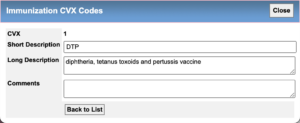
Injection CVX Codes #
CVX codes are a unique code specific to an injection medication. They are an important component in the ordering and tracking of immunization medications. When entering the CVX codes be sure to enter them exactly as provided by the manufacturer or from a CDC list as well as the exact name and a description.
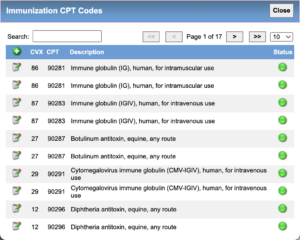
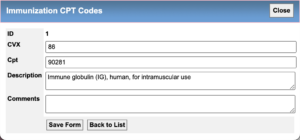
Injection CPT Codes #
Immunizations have specific CPT codes that are linked to the CVX and MVX (Manufacturer Codes). The list of linked CPT codes is provided on the CDC Immunizations website.
- The application comes pre-loaded with the most current list of immunization CPT codes.
- When adding a CPT code it is important to add the exact CVX code and the exact medication name for proper mapping to occur.
- Adding CPT codes is not necessary for non immunization injections.
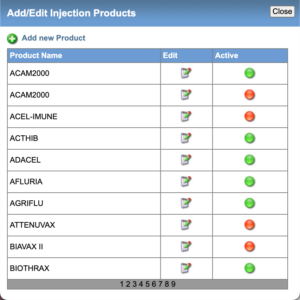
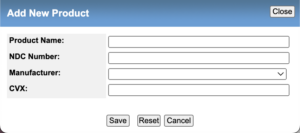
Injection Products #
When adding an injection medication product it is important to complete the fields in the manner that you want them to appear to the user in the provider injections module.
- The Product Name and NDC number should be entered exactly as it appears on the manufacturers label.
- The Manufacturer will already have been loaded and may be accessed from the drop down menu.
- The CVX (Product) code should be entered exactly as it is provided by the manufacturer.
Form Document Templates #
UrgentChart has a stand alone forms workflow for user forms that are not uploaded or scanned but part of the practices daily workflow. They may include Referral thank you letters, Provider and patient corresondence, return to work forms, and the like. The concept is that a user in one department creates a form that needs to be distributed outside of the practice via fax, mail, or email. There is a separate forms worklist where the forms may be managed and completed by practice staff other than the creator of the form (See Forms Worklist).
If a patient has a form attached to an accession number, chart, or clinical summary it may be viewed from any location where a View Forms button is available.
The View Forms Button is available on most screens including Registration, Triage, Charting, Charted, Billing, Orders, etc..
Documents or forms must first be created in the Admin Main Tables. They may be copied from other soureces like MS Word, Excel, or created in the Form Document Templates hyperlink.
Click on the Form Document Template Hyperlink to open the Add Edit Documents Templates Screen. From this screen you may Add a new form, Edit and existing form and deactivate existing forms.
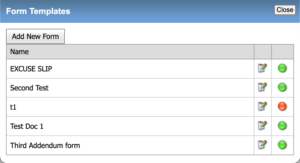
Edit Existing Forms #
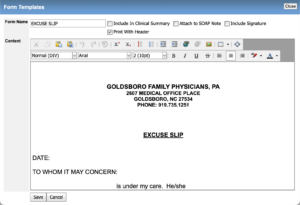
- By double clicking on an existing form template the existing form will open for easy editing. Documents may be copy and pasted in MS Word format or created in the editor.
- By checking the Include in Clinical Summary box the form automatically is filed with the exam visit accession number on the clinical summary.
- By checking the Attach to SOAP note the form will be accessible from the exam visit accession number chart.
- By checking the Include Signature the creators digital signature will be automatically added to the bottom of the form.
Creating New Templates #
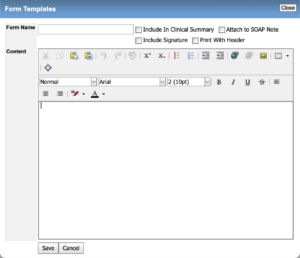
- By double clicking on the new form template a blank form template will open. Documents may be copy and pasted in MS Word format or created in the editor.
- By checking the Include in Clinical Summary box the form automatically is filed with the exam visit accession number on the clinical summary.
- By checking the Attach to SOAP note the form will be accessible from the exam visit accession number chart.
- By checking the Include Signature the creators digital signature will be automatically added to the bottom of the form.
- The form templates will now be available on most UrgentChart Screens as well as on the Document Forms Worklist.
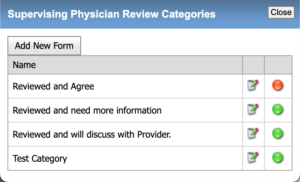
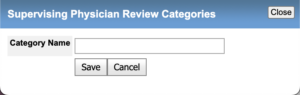
Physician Review Categories #
Users have the ability to create customer physician review categories. This is done from the Admin – More – Tables – Physician Review Catergories section in the EHR.
- New categories may be added by clicking on the Add New Form Button.
- Existing categories may be edited by clicking on the Edit Icon.
- Categories are active if green and inactive when red. Activation and deactivation is done by clicking on the activiation icon to the right of the edit icon.
Settings #
With ADMIN privilages the user has the ability change the system default settings to customize UrgentChart to the needs of the practice. Some of the settings are password expiration, paging size, default country, default state, clinical decision support rules, system colors, messages for the message board, building the PMH screen by diagnosis code, adding exams to the PMH by CPT code and site.
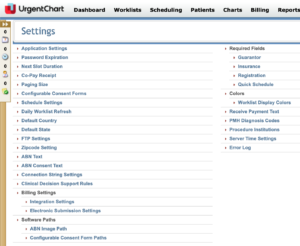
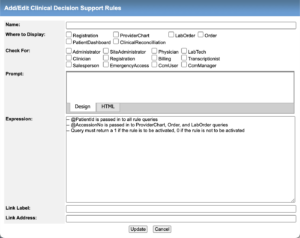
Clinical Decision Support Rules #
UrgentChart provides a practice with the ability to create clinical decision support rules based on Vitals, Diagnosis, Exams, Lab Results, and other parameters that may assist your practice with patient information. Typical Decision Support Rules may be set up for BMI, Blood Pressure, Temperature, etc.
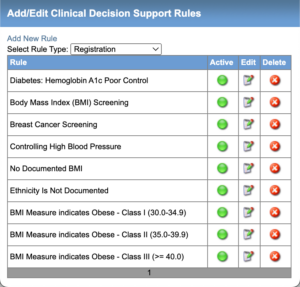
Creating New Rules #
From the Administration – Settings – Clinical Decision Support Rules link then Add Edit Clinical Decision Support Rules Screen will open. Select what page function that the rule will apply to.
Note: Unless a qualified staff member has been trained by UrgentChart personnel on creating support rules it is recommended that you contact UrgentChart for assistance.
Functions #
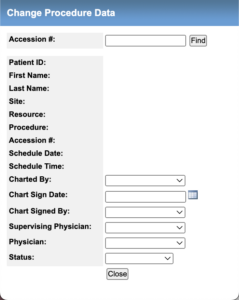
Change Procedure Data #
ADM users may also change the status of a procedure by entering the procedure’s accession number at the Change Procedure Data screen and updating the status from the indicated pull down. Note that changes made to the procedure status do not affect any existing timestamps or user-stamps associated with the record.
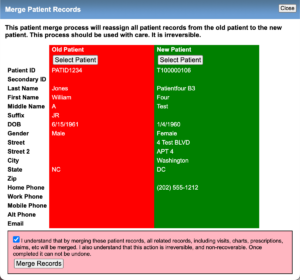
Merge Patient Records #
Merging records may only be done through Functions on the Admin Functions toolbar. When a procedure (as noted by accession number) is merged, it is moved from one patient’s record to another. To merge a record, select Admin – Functions – Merge Records.
- Enter the accession number that needs to be moved and the ID of the patient to which the record is to be moved. Select Submit Info. This will allow the user to view the information that is about to be merged.
- To complete the merge process, select Merge Records. Merge Successful will appear at the top of the page in bold red lettering.
- Once the merge has been completed, the accession number and all information
attached to that number (such as the report) will appear on the designated patient’s history. Any scanned documents attached to the patient’s history/radiology order will not merge. Please print all pertinent documents before the merge and then rescan after the merge.

Administrative Tools #
UrgentChart provides numerous tools for practice and site managers and the clerical and administrative teams. The include but are not limited to management reporting, quality reporting, employee management and reporting, patient billing, and injection products management, CCDA generation and management. Some of the listed functions may require Admin level privalages for access.
Reports #
Management Reports #
Reports are accessed from two locations in UrgentChart. The first is from the Reports Main Menu at the top of the screen. The second is from the Administration functions Reports menu.
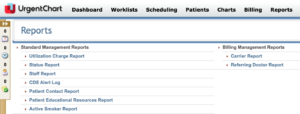
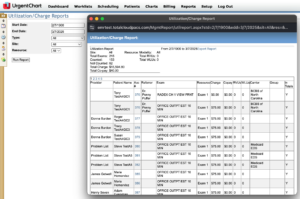
Utilization Charge Report #
The Utilization Charge Report provides the user a report for tracking the utilization of resources, modalities, providers by exam type.
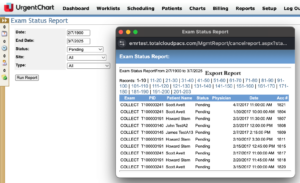
Exam Status Report #
The Exam Status Report provides users with a report of the number of exam types, Patient ID number, Patient Names, their Status, the Physician, the DOS, and Accession number.
Patient Contact Report #
The Patient Contact Report provides users with a printable or exportable document to view that may be used to identify and contact all patients with a Pending appointment. The report may be downloaded, saved, or printed in a PDF, Excel Document, CSV, HTML, etc.
Referring Doctor Report #
The Referring Doctor Report provides users with the demographics of the providers that have referred patients to specific sites for a selected data range.
Patient Educational Resources Report #
The Patient Educational Resources Report provides users a list of all patients that have been provided Education Resources during a specific date range.
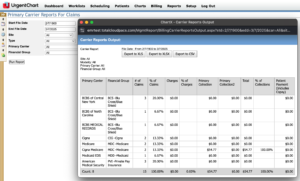
Carrier Report #
The Carrier Report provides users with the financial amount billed by Primary Carriers for all claims over a selected date range by Site, Exam Type, Primary Carrier, and Financial Group.
Log In #
Access to the UrgentChart requires a user name and password for each user to be set up by someone with ADM privilages.
The site being accessed from must also be selected from the drop down menu. This is necessary for accurate ordering and receiving of E-precribing orders and requests from pharmacies.
Patient Management #
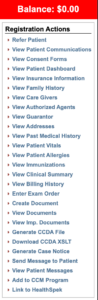
Registration #
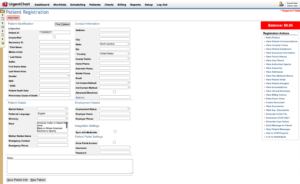
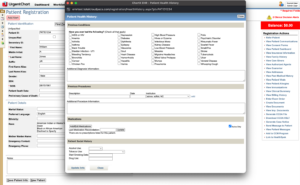
The Patient Registration module may be accessed by Patients – Patient Registration.
CCDA Management #
The management of the CCDA is performed primarily from the Patient Registration screen.
To access the CCDA functions select Generate CCDA File under the Registration Actions side panel.


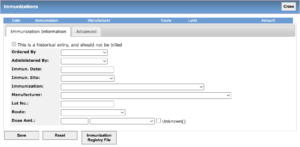
Generate Immunization File #
The management of the Immunization File is performed primarily from the Patient Registration screen. On the bottom of the screen Patient Immunization Files may be generated to download and submit to Immunization Registries.
Note: The individual registries will have to provide the preferred method of delivery of the file.
Syndromic Surveillance #
The management of the Syndromic Surveillance File is performed the Patient Registration screen. It can be access in the Registration Actions sidebar under Generate Case Notice.
Note: The individual registries will have to provide the preferred method of delivery of the file.

Patient Search #
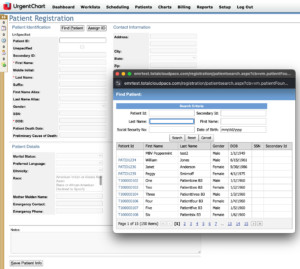
To find an existing patient, select the Find Patient button. From the search window, select the appropriate selection criteria and press Search. A list of patients that meet the search criteria will appear. Selecting the desired PatientID hyperlink will prompt the registration screen.
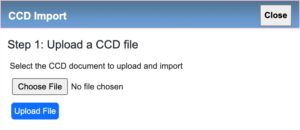
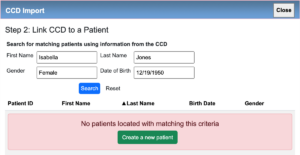
Import CCDA #
Patients or Providers may wish to add their personal health into the EHR. This is done by importing a CDA file from Patients – Import CDA.
Note: The file format is XML.
After a Patient CCDA has been uploaded it may be imported and merged with an existing patient record, or creating a new patient record. This is the mechanism for reconciling patient clinical information.
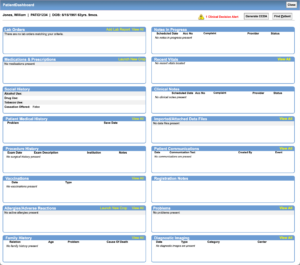
Patient Dashboard #
The Patient Dashboard is a complete summary page of patient medical records, clinical notes, and documents. The Patient Dashboard is accessed by going to Patients – Patient Dashboard – Find Patient.
The Patient Dashboard may be accessed from the Patient Registration Screen as well as any charting screen from the Actions Bar on the left side of the screen and under the Main Patients Menu at the top of every screen.
Importing Documents #
A user has the ability to import predefined documents via Patients – Imported Documents – Import New File.

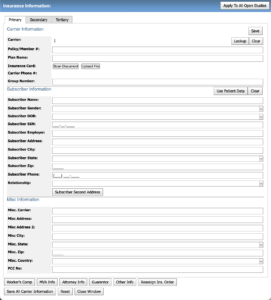
Insurance Information #
Insurance information can be accessed via the Registration Actions sidebar on the Patient Registration screen by selecting View Insurance Information.
Insurance information may be stored for up to three carriers per patient. If Patient and Subscriber Name are the same, all required patient information will upload when choosing Use Pt Data. Each time patient registration data is changed or updated the insurance subscriber information must also be updated, if the subscriber and patient are the same.
If a patient’s insurance information has changed since the last visit, the Apply to All Open Studies button allows the user to associate all ordered, pending and open status’ with the updated insurance, while not changing previous data.
A scanned image of the patient’s insurance card may be uploaded from this screen using the same procedure as uploading a scanned photo ID. Insurance information, including scanned insurance cards, may be stored for up to three insurance carriers per patient. Document images of the insurance cards may also be attached to the patient record using the EXE Scanning Component described previously.
Relationships that appear in the pull down menus on the insurance and guarantor pages are configurable in Admin Functions-Billing-Relationship Codes.
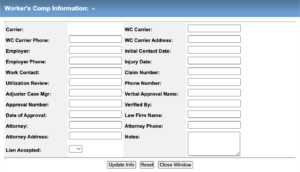
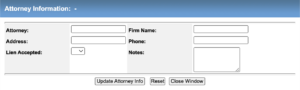
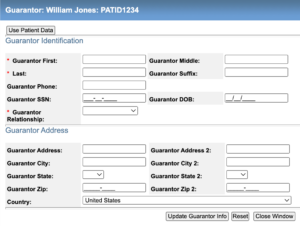
In addition to insurance information, fields for Worker’s Comp, MVA, AttorneyInfo, Guarantor data, HIPAA data, and other miscellaneous data may be accessed at the bottom of the Insurance Information page.

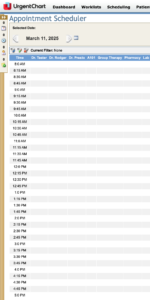
Appointment Scheduler #
The scheduling module is accessed via Scheduling – Appointment Scheduler.
- The schedule may be advanced or reversed one day at a time by using the arrow controls surrounding the date display.
- If a user is assigned to only a single site, he/she will only see the schedule for the site at which he/she is assigned.
- The schedule is color-coded per Management Functions Settings.
Find Patient #
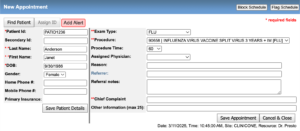
To schedule a procedure at an open slot, click on the desired open slot. A Quick Schedule pop up screen will appear. Using the Find Patient button, a previously registered patient may be selected. If a new patient is to be scheduled, the Patient ID, First Name, and Last Name may be manually entered. The system will assign the Patient ID for a new patient, if the Assign ID button is selected.
The following fields are required:
- Exam Type
- Procedure
- Chief Complaint
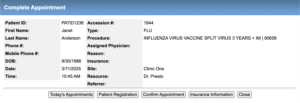
Complete Appointment #
If procedure prep information has been entered at the Procedure table for the procedure scheduled, the prep instructions will appear at the Schedule Confirmation screen. If desired, the user may go directly to the patient’s insurance information by pressing the Insurance Information button. The confirmation icon appears here and may be used as direct link to Confirm Schedule function.
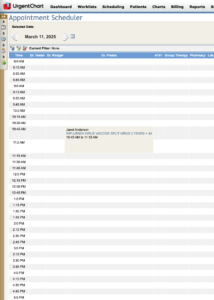
After pressing Close on the Schedule Details screen, the scheduled procedure may be seen in the desired slot. If an additional procedure is to be scheduled, press Additional Procedures rather than Close. The Quick Schedule pop-up screen will be opened with all the patient’s demographic information, ordering clinician, and history information populated. The scheduling procedure described previously may be used to schedule additional procedures as well.
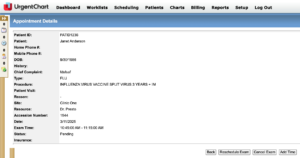
Appointment Details #
The appointment details can be accessed by clicking on the desired appointment.
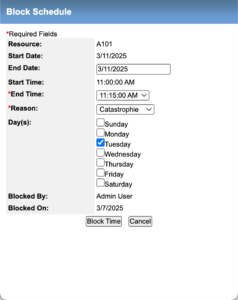
Block Schedule #
Specific segments of time and days may be blocked (such as PM, Holiday, Vacation, etc.) per resource, for reasons defined at Additional Tables – Block Reasons from the Admin section. To block a resource, from the Schedule Grid, select an Open slot at the desired start block time. Press the Block Schedule icon in the upper right-hand corner of the Quick Schedule screen. Based on the end time selected and end date selected, Block Schedule will appear on the schedule grid until canceled.
In addition, segments of time may be Flagged with information pertaining to a specific resource (such as “Physician on Site”, etc.). By clicking on the Blocked Schedule note on the scheduler the option to delete the Block may be performed.
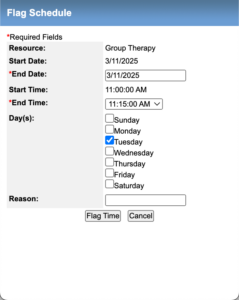
Flag Schedule #
Flagged reasons are entered as free text. Flagging a resource will not block the schedule; it is for notification purposes.
Time Conflicts #
If the length of the schedule slot available is less than the total time required for the procedure, the user will be presented with aprompt.
Users with “Overbook Privileges” are able to overbook exams on the schedule grid. For instance, if a user with Overbook Privileges is attempting to schedule a 30 minute exam in a 15 minute slot, the system will generate a message indicating a time conflict and will ask the user if they would like to continue. Users without Overbook Privileges will receive a message that indicates they cannot schedule during that time slot and must choose another slot.
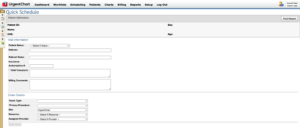
Quick Schedule #
The Quick Schedule option from the Schedule options provides the user the ability to build a patient appointment without a time slot and minimal information. This option is used primarily for existing walk in type patients If there is an insurance carrier attached at the Insurance screen, it will carry over to the Quick Schedule screen. The procedure is automatically assigned an accession number.
Steps:
- Find Patient
- Select an Exam Type
- Select Primary Procedure
- Add Patient Status
- Add Chief Complaint
- Select a Resource
- Enter Order
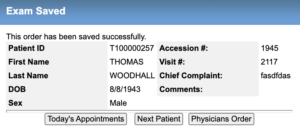
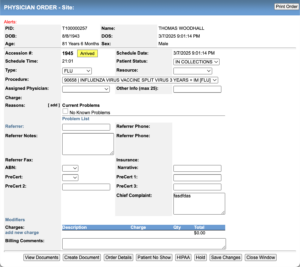
Physicians Orders #
The Physician Order is automatically created from the data entered on the Registration, Insurance Registration and Scheduling Screens. All data including uploaded documents and images may be accessed from the order. Additional documents may be added by scanning or uploading. The order may also be edited by selecting the Edit Order button. The order may also by printed. The order may also be accessed and edited from the Registration main screen.
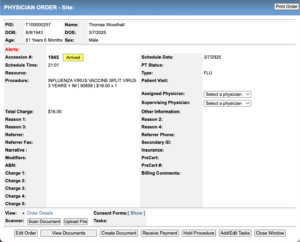
Editing Orders #
Editing Orders begins by clicking on the bottom left Edit Order button. The Edit Order screen opens.
Available options:
- Exam Type
- Procedure
- Resources
- Exam Reasons
- Adding Charges
- Printing Consent Forms
- Printing Order Details
- HIPPA Patient Release Information
- Hold/Un-Hold Procedure
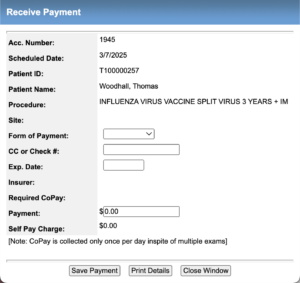
Receive Payment #
Receiving a payment at the time of service is added from the Order Screen – Receive Payment. Enter in the payment details and a copy of the payment / receipt may be printed for the patient.
Steps:
- Select type of payment from the drop down menu.
- Enter in Credit Card number and expiration date if paid by credit card.
- Enter in payment amount.
- Save the Payment by clicking on the Save Payment button.
- Print the details for the patient.
Add/Edit Tasks #
Tasks may be add to the Assignments worklist for completion. The task will remain on the task worklist until marked completed.
Past Medical History #
The Past Medical Histroy screen may be accessed from the Registration, Triage, and Charting screens by clicking on the Past Medical History button.
Previous Conditions tick boxes are used to identify the previous conditions. The previous conditions (ICD9’s) are set up on the back end iin Administration – Previous Conditions Codes through a Reason Code query and add process. This allows different specialties to only tshow the previous conditions relevant to their specialty.
Previous Proocedures are procedures that may or may not have been performed at the practices facilities. They may be added directly from this screen or pre-built in Administratiion-Previous Procedures.
Medications are added by two processes depending on if e-prescribing is activated for the practice. If e-presribing is not activated all medications are loaded on the Medications Table in Administation during set up. They may also be added as required in the same manner over time. Medications need to be checked Active or Inactive for accurate recording of patient active and archival records.
If -e-prescribing is activated then the e-prescribing module will automatically launch. Medications and allergies may be added and edited in real time. All medications information will automatically update on the patient record in the E.H.R.
Social History includes familial and smoking related demographics. It is important that the correct smoking designations are used from the drop down for accurate smoking history reporting.
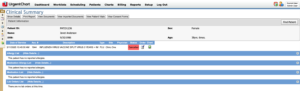
Clinical Summary #
Clinical Summaries provide the user and patient with a real time history of all clinical events that a patient has incurred within the E.H.R. They include all office visits, reasons, exams, medications, medication allergies, and lab orders and report.
From the summary view the provider and provider staff have the ability to open the order by clicing on the Order Icon as well as view the chart by clicking on the Chart Icon.
The summaries may be printed, exported, or viewed through the patient portal on line from this screen. Clinical summaries are accessible through the Patients Header Menu and buttons located in Registration, Triage, and Provider screens.
By clicking on the Show Details button a detailed clinical summary will open. The detailed Cllinical Summary provides provider office address information, Chief Complaint, Procedure, Diagnosis, Exam, Medication, Medication Allergy, and Labratory detailed information.
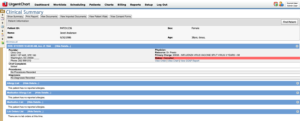
Clinical Summary Details #
Lorem ipsum dolor sit amet, consectetur adipiscing elit. Etiam ac ligula imperdiet, consequat urna vel, mattis velit. Suspendisse aliquet ut enim quis blandit. Curabitur consectetur id velit vitae laoreet. Fusce id justo magna. Proin mollis venenatis lacus in pellentesque. Mauris ipsum arcu, porttitor et lobortis nec, feugiat eget lorem. Vivamus a eleifend tellus. Integer vel diam eu dolor tempor commodo vel ornare metus.
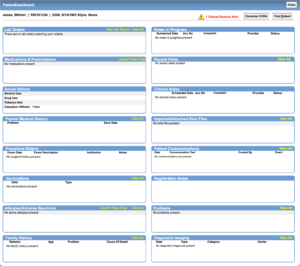
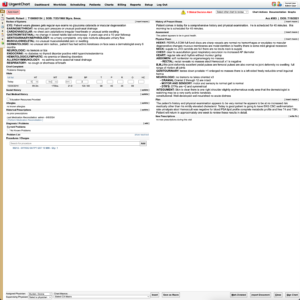
Patient Charting #
Patient Charting is consolidated on a single screen that includes all patients vitals (View up to Four), HPI, ROS, PMH, Social History, Medications, Prescriptions, Allergies, Physical Exam, Assesement and Plan, Procedure/Charges, Current Problems, and Past Problems. There are also more than 20 additional actions, documents, graphs, Alerts, and shortcuts that may be accessed from the Charting Screen.
The Chief Complaint created at the Order may be edited from the Charting Screen.
Charting may be completed by free text typing, Voice Recognition, and Macros. The Charting Screen is best opened from the Provider Work List.
Patient Demographics #
The Patient demographics are viewable and auto loaded from registration on the top of the chart screen. Name, ID, DOB, Age, Visit/Acc, Date of Service and Alerts are visible.
The Alerts may be edited from this screen as well. The Assigned Physician and Supervising Physician’s are also editable on the charting screen.
Vitals #
Vitals for Height, Weight, BMI (automatically calculated), Blood Pressure, Temperature, Pulse Rate, Respirations, Oxygen, and Head Circumferance are free text entered in the appopriate fields. Up to four measureement are visible at any time. More Vitals may be entered and export by opening the Vitals Icon.
Note: Patients may also add vitals to their records from the Patient Portal.
Growth Charts #
Growth Charts for pediatric use are available from the Graphs drop down menu at the top right of the screen (ages 2-20). Graphs include Height, Weight, BMI, Head Circumferance. The graphs are loaded from the CDC database.
Education Resources #
After Educational Resources are provided to patients the Provided Education Resources check box on the bottom left corner of the screen needs to be activated to maintain credit for reporting purposes.
External Medications Provided #
To maintain credit for reporting of the amount of Prescriptions provided by a non integrated ERX application activate the check box on the bottom left corner of the charting screen.
Preview Charts #
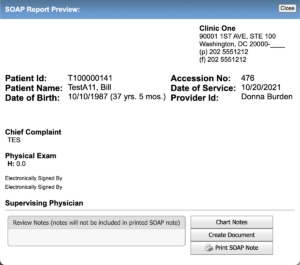
Previewing the Charts may be done by clicking Documentation – Preview SOAP Note.
The preview soap note opens the complete chart in a pop up screen. From this screen the chart may be viewed and printed.
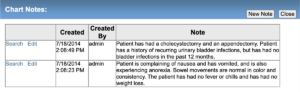
Chart Notes #
Chart Notes are accessible via Documentation – Add Chart Note.
Charts notes are patient notes that do not appear on the actual patient chart. They may be added and viewed from the Triage and Provider Charting Screens. They may also be viewed from the SOAP preview pop up screen and added while previewing and editing a chart.
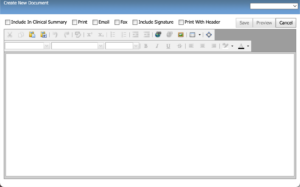
Create New Document #
To create a form first click on the Create Document button on the top and bottom of the Triage and Charting screens. The create new document screen will open. From the drop down menu on the top right all document templates that have been created in the application will be available. Once selected they will automaticlly load into the create new document screen. Once the document loads it may be edited and notated by using the tick boxes for use. Once the document is saved it will move to the Document Worklist for processing.
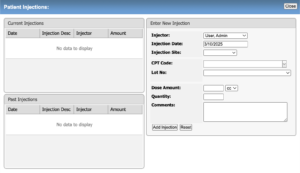
Patient Injections #
The injections module may be launched from either the Triage or Provider charting screens by clicking on Chart Actions – Injections. From the injection screen providers may view past or current injections.
- User selects the site on the body that the injection will be adminstered (Injection Site) from the drop down menu.
- CPT codes are queried by typing in the name or number of the injection CPT code (ex: J2550) and all injections from the J25 will appear.
- Select the Lot number: The lots that are active in the injection management module will be available from the Lot No. drop down menu. Compare the lot number on the list to the lot number on the product. If they do not match it should not be selected. If the lot number on the product is not available on the menu it must be added prior to completing the injection.
- After a lot number is selected the Product Name and NDC number will automatically populate on the screen and also be attached to the claim for billing.
- Add the dose amount and select the proper type from the drop down menu.
- Add the Quantity of injections performed of this specific CPT code (Charte) and Lot number. If the Chart (Charge) or Lot number change create an additional injection. Note: The quantity selected will also auto-calcuate the proper charges to be displayed on the order as well as for billing on the claim.
- Click on the Add injection. The injection will appear in the Current Injections field to the left.
Laboratory Integration #
UrgentChart has complete internal and external lab functionality. For Internal labs the lab tech functionality is accessed by opening the laboratory worklist from the Main Work List Drop Down Menu on any screen. The Lab Order and Results may also be opened from the Charting Screen from the Actions Drop Down Menu.
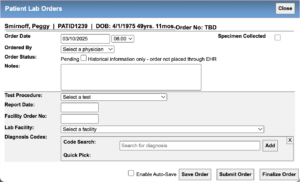
Creating an Internal Lab Order #
- Click the New Lab Order Button
- Select Use In-House Lab Services
- Select a Physician
- Add Notes
- Select Specimen Collected with check box if a specimen is collected.
- Select a test from the Test Procedure Drop Down option.
- Enter a Date
- Enter an Order Number
- Select or Create a Facility Name.
- Select a Diagnosis Code or Pick one from the Quick Pick List. 9): Save or Submit the Order.
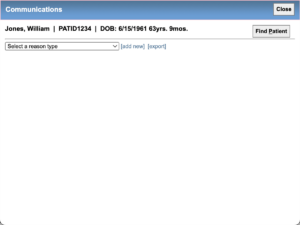
Patient Communications #
Patient Communication Tracking may be done for each patient on the Patient Communication Screen accessed from the Actions Side Bar on the left side of each screen as well as under the Patients Main Menu on the top of every screen and the Patient Registration Screen. All types of communication will be stored for future use. All communications will also be viewable on the Patient Dashboard.
Worklists #
Document Worklist #
The document worklist may be accessed by opening the Worklists main menu and clicking on Documents Worklist.
The Document Worklist providers the user the ability to sort and search documents by template name, author, and patient. The form details include the date it was created, author, name, patient I.D., patient name, and accession number. The task that the creator desires to be done will show as checked off in the tick box. Multiple documents may be printed at once if all of the print check boxes are checked off. Only the documents with the check box activated will print.
The documents may also be opened and viewed by clicking on the blue teamplate name.

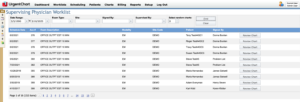
Supervising Physician’s Worklist #
UrgentChart provides practices the ability to perform Clinical Quality Checks and oversigning of charts through the Supervising Physician Module. The Supervising Physician Worklist is found in the Worklists Main Menu. Once the Worklist is opened Supervising Physicians may query for charts by a Date Range, Exam Types, Sites, and who a chart was Signed By: A Randomizer tool is also available.
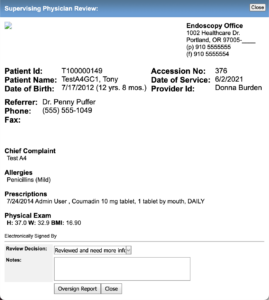
By Clicking on a Review Chart button on the right side of the worklist screen the selected chart will open. After the Chart is reviewed the Review Decision may be selected from the Review Decision drop down menu. The Review Decisions are created in Admin – More Tables – Physician Review Categories. See Physician Review Categories.
Once the Review Decision and any notes are added the chart may be signed by clicking on the Over Sign Report button. The Supervision Physicians signature will also appear on the chart. The chart will also be removed from the Supervising Worklist. The Supervising Physicians comments will appear on the bottom of the chart SOAP Preview but will not appear on the printed chart.
Reports #
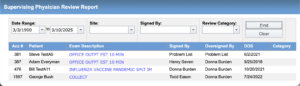
Supervising Physician Review Report #
Users of UrgentChart have the ability to review a list of the charts that have been reviewed and oversigned. This report is available from the Reports Main Menu. Charts may be queried for review by date, site, signed by, and category.
Once the critieria is selected the patient Accession Number, Name, Exam Description, Signed By, Oversigned By, DOS, and Category selected are viewable. The SOAP note may be reviewed by clicking on the blue Exam Type hyperlink.
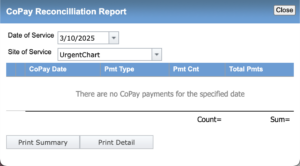
CoPay Recon Report #
The CoPay Reconciliation report provides the site or billing teams the ability to reconcile the copay income received each with their respective cash box. Funds entered in the CoPay received screen accessed from the Order screen will automatically be added on a daily basis providing the data for this report. From the Reports Main Menu click on the CoPay Reconcilliatin hyperlink to open the create report screen. A drop down menu will provide a calender to select the date of service. A summary may be viewed by clicking on the Print Summary button and the details of the funds received (ex: Cash, Check or Credit Cards) details will be displayed and available to print or download.
Meaningful Use Measurements Report #
The Meaningful Use measurement reports and dashboard is available by clicking on the Meaningful Use Reports Hyperlink in the Reports Main menu. The measurements are automatically calculated and available for reporting when the staff uses all of the functionality associated with qualifying for the Meaningful Use incentive program. Note: The Quality Measurement measures and reports are viewed and created from the PQRS Reports hyperlink.
After the hyperlink is clicked the Meaningful Use Measurements Dashboard will open. Each provider is calculated separately and may be selected from the Provider drop down menu. The date range defaults to a 90 day reporting period and this may be overrided by using the drop down calender menu’s. The Numerator, Denominator, Actual Percentage qualifying (%) and the Target Percentage (%) are displayed and updated in real time thorughout the day. Measure that are meeting the requirement will be highlighted with a green check mark.
PQRS Measurements Report #
The PQRS measurement reports and dashboard is available by clicking on the PQRS Reports Hyperlink in the Reports Main menu. The measurements are automatically calculated and available for reporting when the staff uses all of the functionality associated with the PQRS and Meaningful Use incentive programs.
After the hyperlink is clicked the PQRS Dashboard will open. Each provider is calculated separately and may be selected from the Provider drop down menu. The date range defaults to a 90 day reporting period and this may be overrided by using the drop down calender menu’s.
The Numerator, Exclusions, amount Not Met, Denominator, and Percentage (%) met are displayed and updated in real time throughout the day. The reports may be printed in XML or PDF format.
Stage 2 Meaningful Use Measurements Report #
The Stage 2 MU Dashboard provides users the ability to quickly evaluate the progress of individual providers in regards to successful Stage 2 Meaningfule Use measurements. The Dashboard provides the ability to see unmet measures as well as review why a measure has not been met. This may be done by clicking on the magnifying glass icon. Once opened the patient name and item(s) missing will be displayed. For items that are not associated with a signed chart they may be corrected directly from this page. (Examples: Medications, Med Recon).
Measure that are met are displayed with a green check mark. The actual and Target measurements are provided for quick viewing.
The MU Measurement Reports are accessed under the Main Reports Menu (see below) Stage 2 MU Reports.
Billing Management Reports #
Charges Report #
The Charges Report provides users with the total charges for a period of time. The report may be created using the following filters:
- File Date
- Date Ranges
- Modalities
- Sites
- Carriers
- Financial Group.
Once the report is created the user is provided with a summary view and a detail view. The Summary view provides the Total Claims amount, Exam Type, Chart Count of exam type, procedure count of exam type and the total dollar amount by exam type as well as the accumulated totals.
The detail view may be exported to MS Excel, XLSX or to a CSV file.
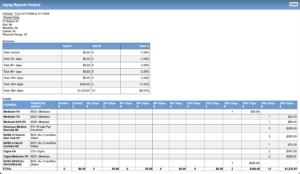
Aging Report #
The Aging Report provides users with a snapshot of the time frame of the total Accounts Receivables (Aging) from Current to 190 plus days.
Collections Report #
The Collections Report provides the user with a full list of all collections for a selected date range by Site, Carrier, Provider, and Financial Group. The report may be exported to MS Excel for additional pivots and sorting.
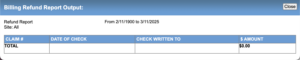
Refund Report #
The Refund Report provides the user with a summary of all claims refunded for a selected date range by site.
Till Recon Report #
The Till Reconciliation Reports For Claims provides the user with a detailed summary of all Payments received for a selected deposit date range and may be filtered by Site, Financial Group, Posted By, Bill Status, Payment Type, Physician, and Patient Status.
Data Export #
The Billing Data Export option provides users with custom queries of the tables and fields related to data that may be required to report to managers, owners, clients, or other entities or individuals seeking billing related data extractable from the UrgentChart.
Additional Queries may be added by sending a request to UrgentChart customer support with details of the name of the Query and the Fields requested.
From the Seclect Query to View drop down simply select the query. The data range defaults to the last 30 days and the query will run automatically. An additional date range may be created by changing the Start Date and End Stop date drop down calenders and clicking on the Get Data button.